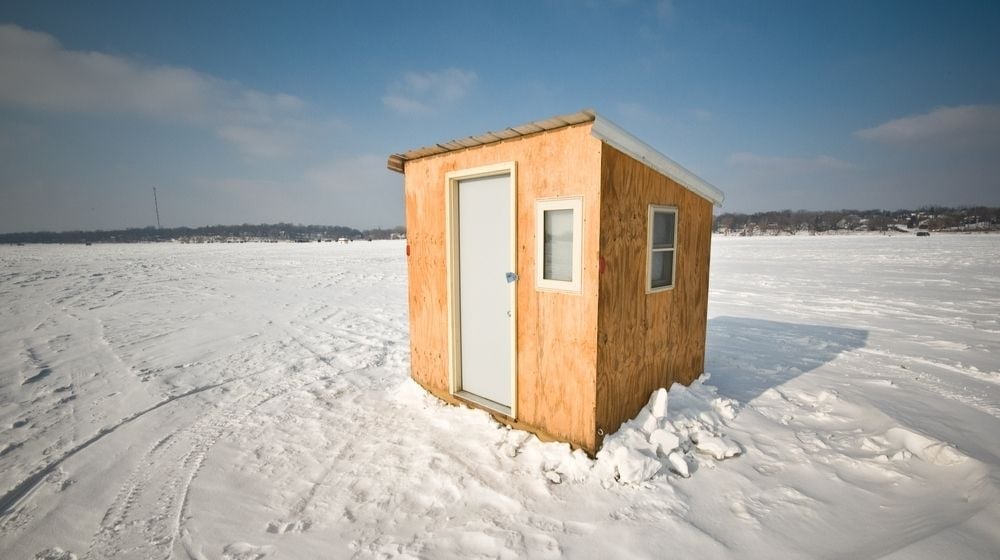

Learning how to build an ice shanty will make your ice fishing experiences warmer by blocking out the wind while keeping your legs off the ice.
Learn with us how to build these affordable yet functional wooden shelters.
RELATED: How To Build a Rabbit Hutch For Your Homestead
How to Build a Functional Ice Shanty in Four Simple Steps
Materials You’ll Need
- 25 (2″x4″x8′) lumber for framing
- 1 thick (4′ x 8′) plywood for the floor
- 6 sheets of 4′ x 8′ utility panels – 2.7mm thick (for the sides, doors, and roof)
- Deck screws
- Small finishing nails
- Wood glue
- 4 hinges
Tools Needed
Step 1. Assembling the Floor Frame
Firstly, layout two 8ft 2×4 beams parallel to each other on the ground. Next, cut to size five 45″ lumber studs and place between the two parallel beams at exactly 24″ apart. Once perfectly positioned, screw them in place using your deck screws.
Secondly, cut two – ½” thick scrap lumber pieces from one of the 8ft 2x4s, flip the assembled floor frame and nail the scrap pieces to act as runners on ice. Once in place, flip the frame and screw in place the thick 4′ x 8′ plywood to make floor for your ice shanty.
Tip: If you need to use a wood sealer, apply it on the runners before flipping the frame.
Step 2. Installing Back and Side Walls Supports

For the back wall supports, cut to size five 52-inch 2x4s with a 26.5 degrees angle at the top end. Choose a rear side for the back wall, align the five 52-inch studs with the 45-inch studs already on the frame floor, and screw them in place with the screws.
Next, cut to size two 52-inch 2x4s, maintaining a 26.5 degrees angle on the top end. Square these studs up with the two corner boards at the back and tightly fasten with more deck screws.
Now cut to size two 75-inch 2x4s with a 26.5 degrees angle at the top end of each stud. Afterward, attach them to the floor frame’s front corners, carefully not to protrude them to the front.
Remember: The ice shanty will have a 26.5 degrees roof pitch hence vital to maintain this all around.
Tips
- Remember to maintain a 24-inch space between the wall supports center to center.
- Ensure your two corner boards at the back don’t overlap to the sides of the floor frame.
RELATED: How To Build A Practical Pallet Chicken Coop
Step 3. Attaching Front Door and Roof Supports
Here, cut out two 75¾ -inch 2x4s with a 26.5 degrees angle on the top end. Now, square these up with the two side supports at the front and screw them in place.
Lastly, cut a 26.5 degrees angle across the side of one 8ft 2×4 for the top span. Once perfectly squared up, fix in place with more screws.
Now for the roof support, cut out five 56½ -inch 2x4s and install them using screws once you have perfectly positioned them.
Step 4. Installing Doors and Panels
In this step, reduce two of the six 4′ x 8′ utility panels to 4′ x 6′ each for the doors. Next, decide whether to frame your doors using the full 2x4s or split them with a saw into 2x2s. Once set, screw in the hinges and mount to the doorframe.
With the frame fully assembled now, install the utility panels using your finishing nails and wood glue. While you will need to cut and adjust the panels’ sizes, the back panel should fall into place without cutting.
On the other hand, the ice shanty roof will take a full panel and additional scraps cut from the door frame to cover the remaining few inches of the slope.
Though the two sidewalls are slightly different due to the boards warping, they should generally be 6′ x 4′ x 4′ with a 26.5 degrees slope. Carefully measure out the sides to have the exact dimensions.
Tip: Framing with 2x2s will reduce the weight of your doors considerably.
Pro Tips
- Consider applying quality paint and or weather-sealing products for increased durability.
- Also, use silicone caulk around the edges to seal any spots to block water and wind.
Watch this video by Rob N Rap Outdoors on building a permanent ice shack:
There you have it, homesteaders. Building an ice shanty is a fun project you can finish over a weekend. Keep things exciting by modifying and customizing the design to your taste.
Happy fishing!
Have you built an ice shanty before? Share our pictures with us in the comment section below!
Up Next:
- Survival Winter Shelter: How To Build A Debris Hut
- DIY Wooden Playhouse Ideas You Can Build For Your Kids
- Lawn Mower Repair: 11 Common Problems And How To Fix Them
Fellow homesteaders, do you want to help others learn from your journey by becoming one of our original contributors? Write for us!
