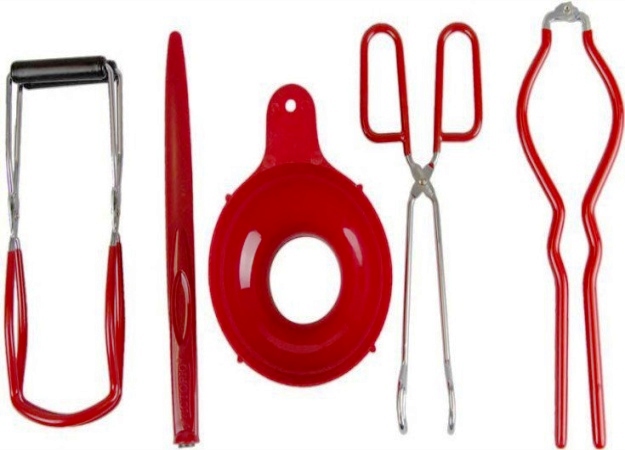
So you want to can, but you don’t know how to use your canning supplies? You’re in luck. Here’s WHERE to get them, and HOW to use them. Canning is easier and more satisfying than you think. It produces delicious, high-quality food that's absolutely economical, and boost self-reliance. Learn how to properly use your canning supplies and keep summer flavor for many seasons to come.
Learn How To Use Your Canning Supplies
I've learned how to can when we were just getting started with homesteading. With the experience I have under my belt, I thought it would be nice to share my knowledge and skills to people who've always wanted to try canning..it's not as hard as you think! It's the same with daily cooking but requires more time and needs more attention to cleanliness. But all in all, it's absolutely doable. So, let's get started.
First, you’ll need some supplies! Hey, we sell them, just click here and scroll to the bottom to claim yours.

Before you begin: Gather Your Canning Supplies:
- water bath canner
- canning kit
- canning scoop
- spoons knives etc.
- canning jar
- foods to be canned
Click here to buy our very own canning kit for beginners: The Can Do Canning Kit
Here’s What To Do With Your Canning Supplies:
Step 1: Clean Jars And Lids With Hot Water
Clean your lids and jars first. Since we will be preserving food, cleanliness is a must.
Step 2: Preheat Jars In Boiling Water
It’s not enough to wash your jars, to ensure that the food you will be canning lasts longer, you must also sterilize them.
Step 3: Prepare The Ingredients
Prepare the food you are going to can.
Step 4: Remove Jars From Heat
Keeping your canning jars hot will keep them from breaking or cracking when you place hot food inside. You can keep the canning jars hot until you're ready to fill it by storing them upside down in a large pot that has 2 or 3 inches of hot water. Heat the water to reach boiling point and turn off heat. Keep the jars in the water until you need to use them.
Step 5: Add Citric Acid
Citric acid is something you can add to increase the acidity of the food. Not only does it improve flavor and color but it also helps minimize the risk of growing bacteria especially when canning tomatoes.
Step 6: Pack The Food
Fill each jar and make sure to leave the suggested head space. If your recipe does not have any suggested head space, leave ½ to 1-inch head space.
Hosting a party sometime soon? These tasty platters will surely please your guests 🙂 https://t.co/LmCkz6fnwE pic.twitter.com/h02S2fnonC
— Homesteading (@HomesteadingUSA) September 20, 2016
Step 7: Remove Air Bubbles
Use a non-metallic spatula to remove the air bubbles around the inside of the jar. Also, don’t forget to clean the rim to make sure there is no excess food. You can wipe it with clean paper towel or a damp towel.
Step 8: Seal The Jars
Center the hot lid on the jar using your magnetic lid lifter and tighten the lid until fingertip tight.
Step 9: Lower Jars Into The Water
Now that you have all the jars filled and sealed, lower them gently into the water.
Step 10: Fill Canner With Water
Fill your water bath canner with water. Make sure that the water is about one inch above the jars.
Step 11: Place The Lid And Start The Process
Place the cover securely and start processing timer when the water begins to boil. Turn the heat on high and let it steam to exhaust for about 10 minutes. This thrusts all the air from the canner. While waiting, check your recipe for how many pounds of pressure the particular food needs to be processed at and how long you need to process it. Be sure to adjust the numbers based on your altitude. Some manufacturers require 15 pounds of pressure when processing foods at 2,000+ feet above sea level regardless of what the recipe says.
Step 12: Remove Jars And Cool For 24 Hours
Remove the jars using your jar lifter, making sure not to tilt them. Allow them to cool for about eight hours or more. You can leave the jars on your kitchen counter top overnight.
Once the containers have cooled, the seals should not appear pot up, it should be sucked down. Press the top of the lids to check whether they are up or down. Then, take off the screw caps and label each jar with date and food type.
When storing jars, make sure to place them in a cool, dark, dry environment. Avoid storing in direct sunlight or high humidity.
Step 13: Enjoy Your Homemade Preserves!
Store them at room temperature until you are ready to use them!
Want to see a video on how to can persimmons? Watch the video below:
Isn't that fun and easy? So, what are you waiting for? Grab the best canning supplies here and get started. Eating food you preserved yourself is completely rewarding, healthy and undeniably delicious!
Need a canning recipe? Click here and learn how to pickle an okra.
Did you find this helpful and interesting? Let me know in the comments below.
Follow us on instagram, twitter, pinterest, and facebook!
Featured Image Via Freedom Preppers

Leave a Reply