

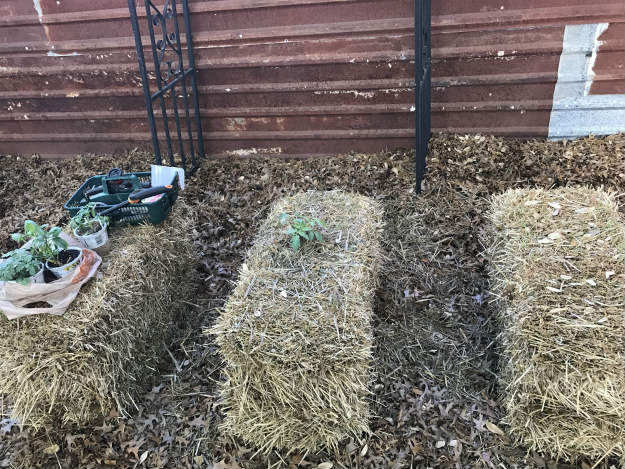
There are so many different styles and techniques to gardening out there to try. Today I want to share with you how to start a straw bale garden! There are so many pros to this style’s pro and con list that I had to try it for myself. I never really considered the possibility of growing food and flowers out of a bale of straw until I tried to plant a garden in Arkansas which I have dubbed, Rockandsaw. Long story short, there’s a lot of rocks in the ground – so raised beds were the way to go. Unfortunately, organic soil can be expensive to deliver by the load, so I opted for the Straw Bale Garden variation of a raised bed. It’s simple!
Straw Bale Garden
Before we move on I’d like to tell you a little more about the advantages to growing your garden using this method.
- There’s far less labor that is required growing fruits, vegetables, and flowers.
- There are virtually no stubborn weeds to have to pull.
- It’s ideal for limited space.
- No digging up any of your yard.
- It really is one of the simpler methods.
OK, so let’s get to it!
Choosing A Good Location
Choosing the location for your straw bale garden or gardens is pretty much the same as choosing one that’s going to be directly on the ground, with a plus that is. If this is your first garden of any sort you’ll learn that there are plants that require full sun while others only require partial sun or full shade. Using the straw bale method makes it a little easier to locate everything in just the right area. Once you pick your spot it’s best to make sure that’s really where you want it because once you start conditioning it the bale will be much heavier and more difficult to move.
If you’re going to be placing the straw bales in a grassy area it’s best to avoid putting the directly onto the grass. You can lay cardboard or a thick layer of newspapers down on the grass before the straw bale or you can go all out and build a frame for it to keep it off the ground. Either way, the direct contact with the grass allows the grass and weeds to work their way up into the bale of straw which then eliminates the weed-free gardening aspect.
Just a quick tip: If you look at the square straw bale you’ll notice one side has short strands of straw and then there will be one side that has long folded strands on it. You’ll want the short strands side facing up and the long folded ends on the ground.
Conditioning The Bale
You might be excited to start planting, but you can’t just throw in the soil and start planting, there’s a conditioning process that is necessary to get the straw bale ready. Once the bale of straw is exposed to moisture it heats up as it begins to decompose. Don’t worry that’s what we want to happen. The conditioning is necessary to help optimize the bale and it will allow the temperatures to decrease. Those straw bales can sometimes reach temperatures of 200 degrees Fahrenheit, which is too hot for the roots so the plants will just die. Conditioning takes about two weeks to complete.
Here’s the process:
- For the first 3 days, you are simply going to saturate the straw bale with enough water to keep it damp.
- When your 3 full days are up it’s time to add some sort of organic fertilizer to the straw bale, as well as, the water. I prefer to use a combination of bone and blood meal that you can find at some gardening supply stores and even online. The fertilizer is important to adding nitrogen to the environment, it’s the nitrogen that helps the decomposition process. There will be directions for the amounts to use on the containers, I believe it’s about a capful of the fertilizer. This process will be done daily for a full week also keeping the bale damp with water.
- For the last four days, the amount of fertilizer is reduced to half. Continue watering the bale.
- Now it’s time to check your temperatures. You can use an old meat thermometer or an actual compost thermometer to measure the temperatures of your straw bales. The temperatures go from high, to higher, and then by the end of the conditioning process, they begin to drop. When your straw bale is the same temperature as the temperatures outdoors you’re safe to begin planting.
Planting Time
You’re going to plant your seedlings just like you would in the ground. Pull or dig out enough straw in the planting area so that the root ball fits comfortably. Dig down deeper for bigger roots and plants like tomatoes and peppers. Place your plant in the center of the hole, add some fresh top soil around and on top of the bale while you fill in the holes around the roots. Mound it up a little around the stem for added security. Water the babies really well and take care of them just like you would if they were in the ground…..minus the weed pulling!
I love this method for so many reasons and I hope that maybe I’ve sparked your interest enough to give it a shot this season. For those of you with back issues, this may be the way to go as well! The bales stand taller so there’s less bending and getting down onto the ground. The straw bale gardening method isn’t just for fruits and vegetables, they’re awesome for all sorts of flowers! Well folks, that about sums it up for the straw bale gardens, until next time!
Up Next: How To Grow Rainbow Corn | Glass Gem Corn
Follow us on Instagram, Twitter, Pinterest, and Facebook!![]() Will you try a straw bale garden? Let us know in the comment section below!
Will you try a straw bale garden? Let us know in the comment section below!
