

Want to learn how to make a wreath? Here’s a tutorial to give you the festiveness and cheerfulness of the season!
How To Make A Wreath | Quick And Easy Wreath Tutorial
to relatives is an important part of Christmas tradition at our homestead. We long ago dispensed with the angst of trying to find and purchase the perfect offering for people who already have everything they ever wanted, or for those who no longer value the accumulation of goods. If you’re looking for the perfect gift for the one who has everything, this evergreen wreath is perfect enough!
How Our Wreath Gift-Giving Started
Nothing says winter holidays like the greenery. The smell of fresh evergreens is such a welcome scent this time of the year.
Sending homemade wreaths is our way of sending a piece of ourselves and our values – immersed in nature in the northern woodlands, simple, and unadorned.
We fell upon the practice almost by accident one year when my husband’s brother happened to mention he was having trouble finding an affordable wreath to buy for himself. He loves the natural aroma of a fresh fir wreath, he told us, but they can be hard to come by in the city.
It just so happens that we have a backyard full of raw materials. It also happens that we learned to make wreaths at a holiday family night at church several years ago.

You can make your own wreath, too. You might now have acres of evergreen trees at your back door, but you can probably acquire them somewhere nearby. Whatever you use, your materials of choice will be reflective of where you live and will enable you to embrace your reasons for living there.
As an aside, a quick primer about trees – all pine trees are evergreens, but not all evergreens are pines. There are as many completely different species of evergreens, so called because most of them retain their green leaves or needles year round, as there are other types of plants. Just as there are varieties of vegetables and flowers and berry bushes, so too is there a wide assortment of evergreen trees.
Our favorite type is the balsam fir. It smells wonderful, and we have it in abundance. If you are lucky enough to be able to go out into the forest and harvest your own, here’s how you can make them into a wonderful wreath.
What You’ll Need:
- Garden Clippers
- Wire Wreath Ring (From 24″ to 36″)
- Drop Cloth
- Wreath Wire
How To Make A Wreath
Step 1: Cut Your Branches
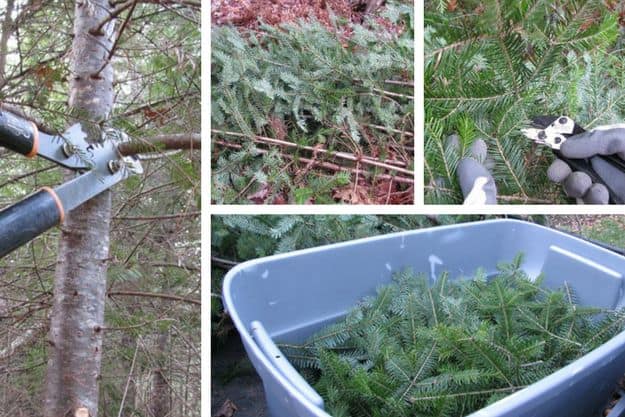
First, make the large cuts, using large pruning loppers or a hand saw. If you are cutting from a moderate-sized tree, cut the entire branches off right at the trunk. If you use small saplings, cut them off at the ground level.
From there, use smaller garden nippers to cut smaller pieces – six to ten inches in length – off the ends. Some people call this “bough tipping”.
A big plastic storage tub – about three feet long – usually holds enough bough tips for three or four wreaths.
Step 2: Gather Materials

Back at the house, we cover the work surface with a drop cloth. Mine is well-loved, bearing the evidence of a wooden fence stained dark red and kitchen trim boards painted turquoise, but it keeps the table from getting all sticky with tree pitch. We use a pair of sturdy washable kitchen scissors, for the same reason.
There are different styles of wreath rings available, but the one we have found is the easiest to work with for this type of wreath is a simple single wire type. The only other thing you need is a spool of wreath wire. Both are easy to find, available everywhere from a big-box store to a craft place. Some hardware or grocery stores even carry wreath-making supplies.
Step 3: Secure The Wire
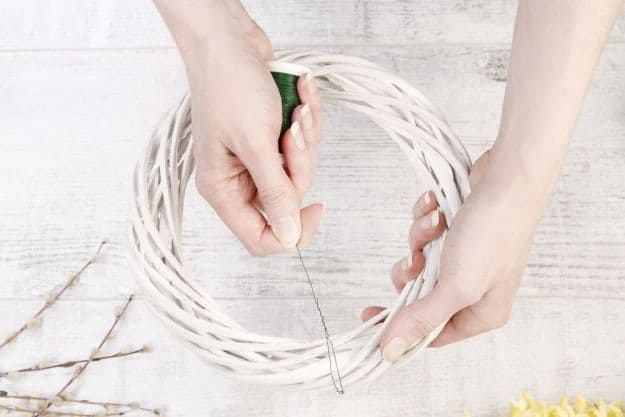
Start by holding about two inches of wire along the ring. Do not cut the wire until the whole wreath is complete – just hold the spool close to your work and unwind it as you go. Hold the two-inch length close to the ring, and wrap the wire tightly along the whole length to secure it.
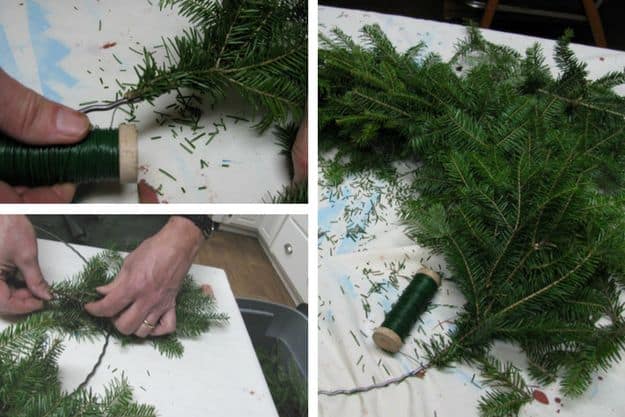
Step 4: Assemble Branches

Assemble four or five tips in a little bundle. Make sure all the needles face up. Use the scissors to trim as needed. You can take pains to keep them all a uniform size and shape if you want to, or you can allow the wreath take on a more wild and natural look.
Step 5: Attach Bundle To Wreath

Hold the ends of the bundle on top of the ring and wrap the wire around both the ring and the bundle. You will need to go around it several times to attach it securely.
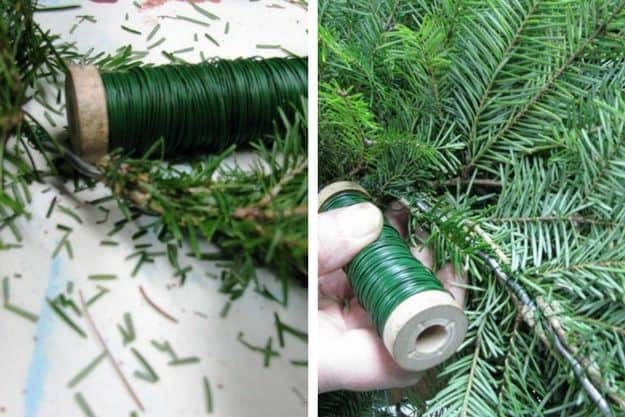
Step 6: Repeat
Assemble and trim another little bundle, move a few inches along the ring on the cut end of the tips, and repeat. Go along around the ring in this way.
Step 7: Close The Circle
When you get back to where you started, lift the first bundle of tips up away from the ring and snuggle the last one up under it, so as to not leave any gaps on the ring.
Step 8: Create Loop, Close Wire
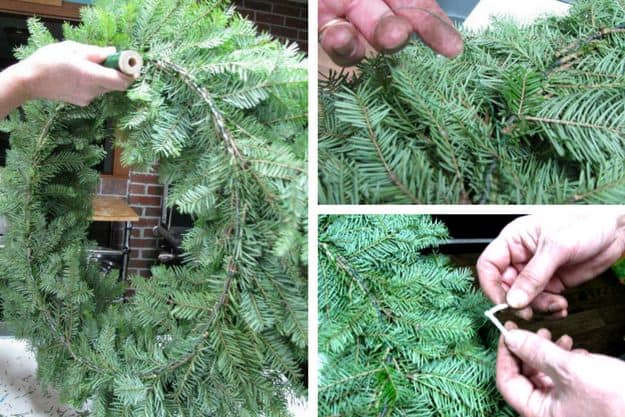
Cut the wire about a foot away from the wreath. You will need this excess to make a loop for hanging. Form your loop, attach it, and trim any extra wire.
Wreath wire is usually green, which makes it challenging to find the loop once you let go of it. You can attach a little twist tie to make the loop stand out.
This is a wreath made from an eighteen-inch ring. It is the perfect size for a standard door. It also fits nicely in a 25-inch square box, which is readily available at shipping stores and online.
Step 9: Hang, Decorate, And Enjoy!

Find the perfect spot in your homestead where you can proudly hang your evergreen wreath. You can also decorate it with any embellishment you can think of.
But we send our wreaths plain. My brother-in-law is a single man who would rather enjoy nature’s understated simplicity than to have anything frilly, and our other recipients like to decorate their own to suit themselves.
The thought of box arriving on someone’s doorstep a thousand miles away, and the image of a loved one opening it and breathing in the sweet smell of our homegrown balsam fir, holds special meaning for us and our family. And now that we have given up searching for the perfect gifts, the one found us turns out just right every year.
Ready to make more than just a door wreath? Then learn how to make a wreath chandelier from Martha Stewart:
Wreaths can be decorated in just about any way imaginable. Ribbons, ornaments, pine cones, toys, gifts, flowers, bows, lace – the possibilities are endless. They can be homey or covered in bling, elegant, or funny.
What do you think of these steps on how to make a wreath? Will you give it a try? Let us know in the comments section below.
Up Next: 14 Pine Tree Sprig Decorating Ideas For Your Homestead

Follow us on Facebook, Instagram, Pinterest, and Twitter!
Editor’s Note – This post was originally published on December 2015 and has been updated for quality and relevancy.
