Learn how to prep your soil for your optimal backyard gardening experience. Starting with the right soil is key for good healthy green vegetables, keep reading for all the details. This is Chapter 4 of 11 for the homesteader that wants to start growing all their vegetables themselves.
How to Grow All The Food You Need In Your Own Backyard
CHAPTER 4:
Soil Prep for Backyard Gardening
This chapter is going to be entirely dedicated to the creation of the optimized soil for backyard gardening. This is arguably the most essential part of your square foot garden. It’s very important that the instructions laid out in this chapter are followed if your garden is to produce a successful and healthy harvest.
Convenience is the name of the game when it comes to the square foot gardening method, and there is perhaps no better place to alleviate hard work from your gardening routine than setting up your garden with a healthy and vibrant soil. In a typical garden, achieving this type of soil would require many hours and weekends of back-breaking work in your yard, and that’s assuming your soil is in such condition that it can even be improved! The optimized soil recipe will save you this time and trouble, so long as its instructions and ingredients are followed closely. It is important that you do not skimp on ingredients for your soil. You may think you are saving yourself a few bucks now, but you will find yourself with a disappointing, failed garden down the line. There are many places in the square foot garden method that can be “tweaked” with cost-cutting measures; your soil is not one of them.

In the past, a gardener had to do a fair amount of research about a large range of subjects related to her garden in order to have a healthy crop yield. This optimized soil recipe will save you the trouble of such research, because it has been perfectly designed with all the needs of the garden in mind. One of the important aspects of healthy growing soil is its pH level, something you may recognize as being related to acidity. Many things have to have their pH levels controlled, and soil is no exception. Soils in different parts of the country have different acidity levels, and even within different parts of the same state, those measurements can differ. But you won’t have to worry about testing your own soil or figuring out how to balance for acidity or alkalinity with the optimized soil recipe. Forget about spring visits to the gardening store, figuring out the proper giant bag of soil to lug home after you’ve performed the tedious work of tilling and hoeing your yard’s soil to make it viable. The optimized soil recipe is all you need—it’s ready to plant in any weather or season, drains and unfreezes better than regular soil, and retains moisture to feed your crops.
Below is the optimized soil recipe. Again, follow this recipe exactly and do not skimp on cheap ingredients—your garden will pay for it!
- 1/3 blended compost, either store-bought or homemade, with at least 5 separate ingredients
- 1/3 peat moss
- 1/3 vermiculite
Mix equal parts of these ingredients measured by volume
One of the best benefits of the optimized soil recipe is it eliminates the rough work of digging up your backyard garden soil every season. Were you to fill up the standard 4x4x12 garden box, that is almost 400lbs of soil—soil you would normally be manually digging up from your own yard! Can you think of a more tedious hard labor to perform on your weekends? Luckily, those days are gone.
The optimized soil recipe was created specifically to address all the typical issues found by gardeners during their work, including their budget. One of the biggest issues for gardening is moisture, and either too much or too little can destroy your crop. But by combining the peat moss and vermiculite, the perfect combination of moisture retention and drainage is created. Once these ingredients have been filled up with moisture, which takes quite a while, they immediately leak out the excess water. Both of these ingredients are available at garden and home improvement stores.
Let’s break down each of the optimized soil ingredients.
Earlier we talked about how important the compost ingredient is. After all, this is the source of all your soil’s nutrients and minerals. While you can purchase compost along with the other ingredients, you also have the option of creating your own compost at home. This is not only money-saving, but also promotes responsible recycling habits that help the environment.
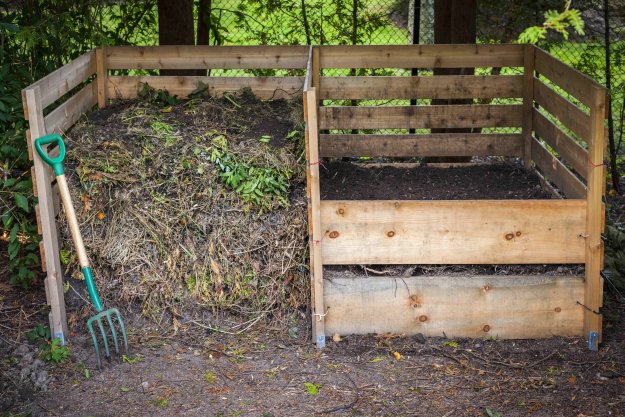
Beginning your own compost pile is not difficult, and you can do so with things you already produce: yard debris, dead leaves, even grass clippings from the lawn mower bag. As organic material decomposes, it creates and releases heat. By piling all this decomposing organic material together, it increases the heat production, which then speeds up decomposition process. We recommend building some kind of structure to house your compost pile in order to keep it from getting too tall and spilling into your yard. This will also help prevent pests from bothering the pile. Something as simple as chicken wire wrapped around fence posting can do the trick. You can add to your compost pile not just yard debris, but household items such as: spoiled or old produce, veggie peels, shredded newspaper, crushed eggshells, or used teabags. You should avoid adding animal byproducts to your compost, and manure from carnivores. You should also avoid adding any bones, whole eggs, cheese or dairy products, or bakery items.

The compost process does take some patience, but you can speed up the process by mixing many types of ingredients and moistening the compost pile regularly. Also, the more you are able to put in your compost pile, the faster it will decompose. The added mass will only increase the speed of decomposition. Mixing and turning your compost pile regularly will also speed up the process. Get creative and increase the potency of your compost by heading to your local grocer and taking home any fruit or veggies the store may be throwing out—those are chock full of vitamins that your soil will love!
Should you decide to purchase compost instead, be sure to verify you are purchasing the best compost for the job at hand. Often, you will be recommended a commercial compost that is not actually as well-suited for the garden as you may think, as commercial compost is simply not made with the same type of care for its ingredients. Sometimes they only include one or two ingredients, robbing your garden of potential nutrients. This is simply a consequence of corporate business. (After all these companies are trying to make money—they’re not being fed from your garden!)
The second ingredient for your soil is peat moss. Like all moss, this is a natural and organic material that has its own relationship to decomposition. Because it is a resource that is non-renewable, we recommend responsible use of this ingredient and have maximized this philosophy in the optimized soil recipe. Thanks to the natural space-saving abilities of the square foot gardening method alone, you already do not need to use as much of this ingredient as you would otherwise be using. This is an important sustainable action.
The third ingredient included in the recipe is vermiculite, another natural resource—this one is actually rock-based! It is created through a process of heat and pressure that turns the rocks into tiny, breathable pieces that hold water for the root systems to locate and utilize. When you head into your garden store to purchase this ingredient, you will find that it exists in several different varieties, meant for different uses. The coarse agricultural grade is what we recommend for your optimized soil recipe, as it will hold the most moisture.
Once you have gathered all your ingredients, it’s time to mix! Ideally you want to mix all the ingredients at once, and we recommend doing so on a large tarp that you can lay out on the lawn, preferably as close to your garden boxes as possible. Those boxes should, at this point, be in their semi-permanent positions. When you are mixing your soil together, we highly recommend you do so outside on a still day, and that you protect yourself with a painting mask. Both vermiculite and peat moss can be dry and dusty, and particles can easily be breathed in and irritate your throat. Having the garden hose at the ready and keeping the pile misted will also help cut down on irritating dust during mixing. You can achieve the mix using a shovel, a rake, or a hoe. Once you’ve done that, you can move the tarp corners to mix even further. You will know the mix is complete when it is hard to tell any ingredient from the other, and when the color of the soil is mostly uniform. When you use the hose to wet the soil, be sure not to soak it completely; it’s important that the soil remain loose so your roots have room to move.
Once the soil is mixed, you can begin filling your garden boxes, providing a fine layer of mist with each layer. Again, do not overwater! Soil should be light! The soil does not need packing down. Any leftover soil can be stored safely in the bags that your ingredients came in, saved for the day when you harvest and replant new crops.
That was Chapter 4: Soil Prep for Backyard Gardening from our Homestead Handbook: How to Grow All The Food You Need In Your Own Backyard
Click Here to Read Chapter 5 >>


Leave a Reply