
Want to know how to properly change a horseshoe? If you want to find out how to shoe a horse, this easy step-by-step tutorial will show you how. Learn horse hoof care and do it yourself!
How to Properly Change a Horseshoe
I’ve been around horses almost all my life in our farm and they are a thing of beauty. Knowing how to ride one is one thing and knowing how to take care of a horse is another. Aside from its mane and teeth, the hooves require special attention. Taking care of farm animals isn’t just about feeding and cleaning them, you have to give them special care.
One homesteading skill any homesteader living in a farm should know is how to change a horseshoe. You may be wondering why it has to be done, when naturally horses live without them. I’m going to tell you why. Wild horses don’t necessarily need horseshoes since they run in a moderate speed and would normally live in arid steppe climate. But once a horse is domesticated, they don’t have the same amount of freedom and would normally have to carry people and other things around. Some horses are even taken to colder and wetter areas that will cause their hooves to become softer thus making it prone to splitting. Now that you know it, horseshoeing is a homesteading skill you should learn and this tutorial will show you how.
WARNING – This is a difficult task. The horse’s foot is VERY SENSITIVE. Please learn from a professional or farrier first. Would you want someone hammering metal underneath your fingernails without practicing first? Only do this by yourself after you’ve mastered the skill. It’s a good one to know, and a great one to learn on hand from the pros.
What you’ll need to change a horseshoe:
- horseshoes
- horseshoe nails
- a pair of chaps
- 10-14 oz. driving hammer
- clinch block
- clinch cutter
- metal pull-offs
- hoof pick
- stand
- clinchers
- nail nippers
- rasp
- protective glasses
- gloves
The images below were captured from some excellent videos by Coast to Coast Equestrian. Catch the full video tutorials at the end of this lesson!
Step 1: Prepare the Horse’s Foot
Run your hand down the horse’s leg, this way, the horse will lift his foot on his own. Start removing the shoe by using a clinch cutter and hammer to straighten all the nails.
Step 2
Take your metal pull-offs and loosen the shoe by gently pulling it down and in.
Step 3
Pull the nails one by one using your metal pull-offs. Once you have them removed, or even just most of it, you can again gently pry on the shoe with the metal pull-off.
REMEMBER: It’s very important to cut the clinches to avoid damaging the horse’s hoof when you pull on it.
Step 4
Now that you have the shoe removed, clean the bottom of the hoof with a hoof pick. Be sure to remove all debris, dirt, etc.
Step 5: Replace the Horseshoe
Prepare the shoe and nails. Ask your farrier the best nail for your horse. Test the nail on the shoe first and make sure that it doesn’t look like the nail sticking out in the photo above.
Step 6
Fit the shoe to the horse’s hoof and put the nail in the shoe. Find the old hole and just hammer the nail in.
TIP: When putting the nails in, make sure that the emblem is facing you to follow it’s natural shape. You can refer to the image below.
Step 7
Then bend or ring the excess nail. Do this for all the other nails.
Step 8
Take your clinch block and place it under the horse’s nails to tighten shoe to boof while driving your hammer to the nails.
Step 9: Time to Clinch the Horseshoe
You’re almost done. Last thing you have to do is clinch your horse’s shoe. So start by putting your horse’s foot on the stand.
Step 10
Using your nail nippers, pry the excess nail up and nip it off. Leave at least 1/8″ so you can still bend it over. Repeat this for all the other nails.
Step 11
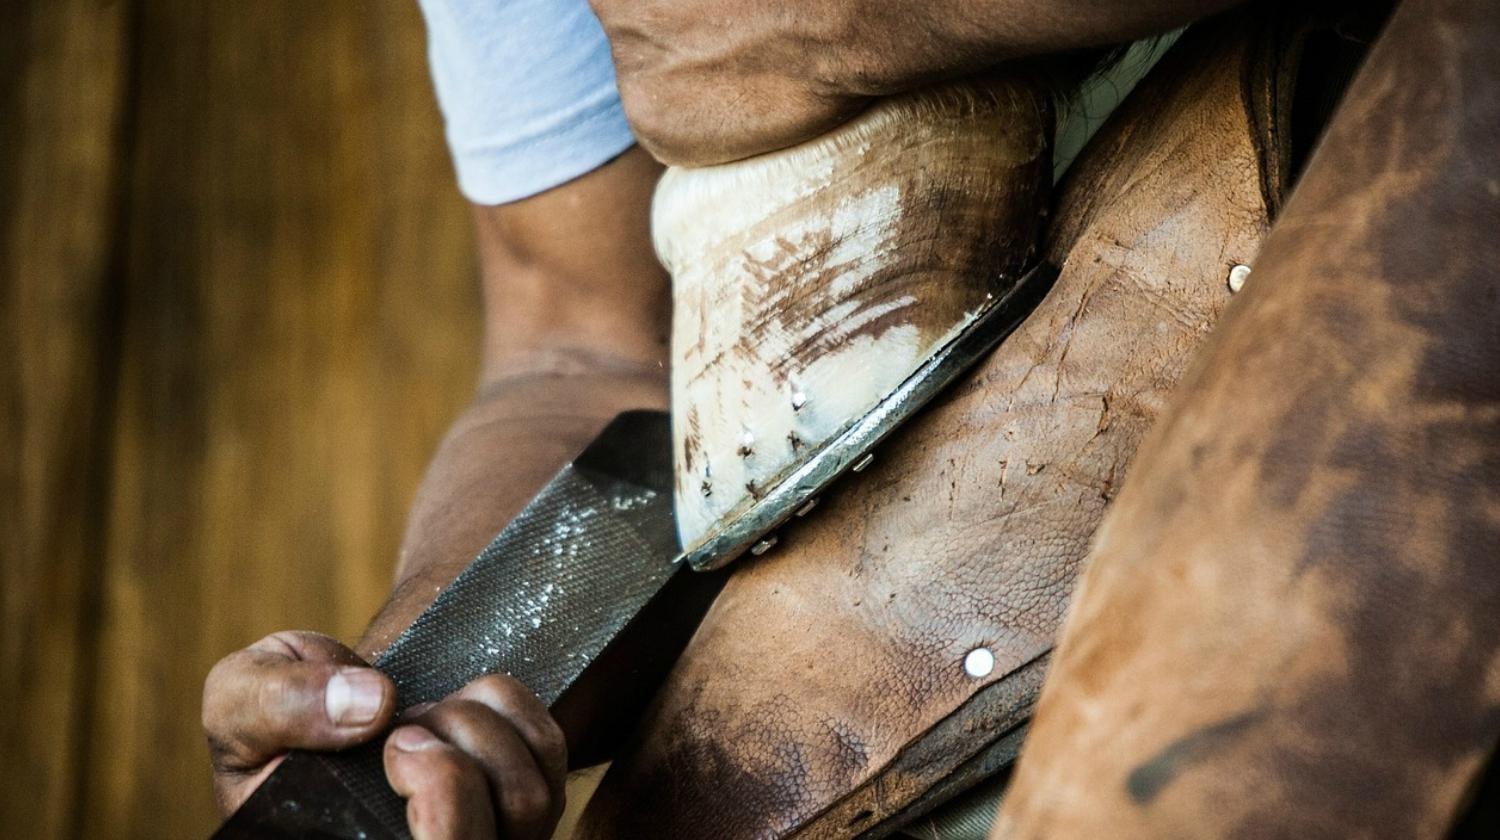
Lightly dust under the nails with your rasp.
Step 12
Now take your clincher to bend the nail over and push it in. Do it for all other nails.
Step 13
Get your rasp again and gently go over the top of the nails heads to remove the sharp edges.
Step 14
Repeat the entire process for the rest of the horse’s hooves as necessary and you’re done!
Want to see how it’s done? You can watch this three-part video tutorial from Coast to Coast Equestrian:
Thanks for the great videos Coast to Coast! CLICK HERE to subscribe to their YouTube channel
What do you think of tutorial on how properly change a horseshoe? Do you think you’d be confident to do it given the opportunity? Let us know in the comments section below!
Have any homesteading projects you’d like to share? Share it with us an we’ll give it a try. We’d love to know what you think!
